Wednesday, 16 July 2014

Art Trip

I have just returned from a trip to the east coast for a family wedding and was able to see some wonderful artworks in some of the great museums there.


I have dreamed of seeing this Cezanne Bathers for many years. I was wonderful to finally see it in person. I had this experience with several other paintings but photographs were not allowed in those situations.


I confess that I am not a fan of cubist works of art however, I enjoyed this little exercise. Perhaps it will inspire me in my art playtime.

Thursday, 3 July 2014

Eagle-eyed


Finished this just in time for the 4th July. Hooray for fireworks.

Monday, 23 June 2014

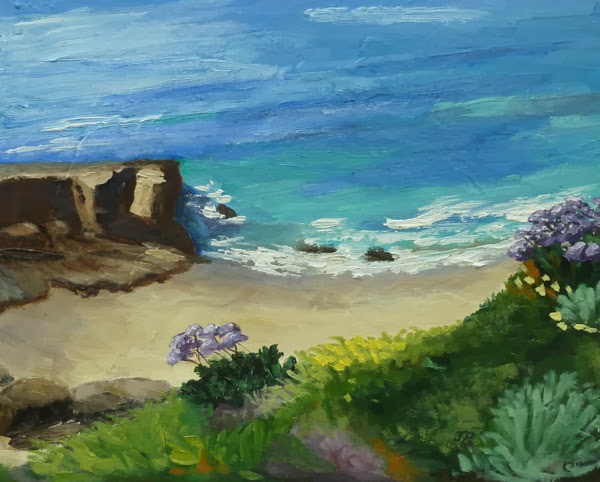
A Patch of Sand


'Dog Patch' 8" x 10" Oil on Board.

This work is named for the surf break called Dog Patch at San Onofre State Beach in southern California. This is the part of the beach where dog owners walk their dogs. It is the surf break for surfers using stand-up paddle boards plus sit down wave skis (which my husband named butt boards).

Monday, 16 June 2014

Come Out to Play

Last year I received a small fashion catalogue from a company called Vince. Immediately I knew I had to make it the subject of a fun project.


I look at the clothes on the page and try to imagine what activity she might be involved in and what could be going on in the background.


I started with a black pen before introducing white and brown pens and eventually a range of colours. 


The drawing doesn't have to be sophisticated, it is all about having fun and being creative.


Monday, 9 June 2014

Sketchy Work

Sometimes I get focused on one medium and forget to work in the other areas that I also enjoy. In an effort not to do this, I have written little notes telling myself to work on all kinds of projects concurrently. 

One such project is to work in one of my sketchbooks in watercolour. To help me along I am also taking a short creative course with summer as its inspiration.

This particular sketchbook started life as a novel. I bought the book for $1 at a local library and use it for drawings, collage projects, and watercolour sketches such as this. To provide an interesting and plain base for painting, I covered the pages first in gesso (although white acrylic paint would also work). The gesso doesn't allow the watercolour to absorb into the paper so the finished effect is different.


Monday, 2 June 2014

Nature's Decoration


The first flowers to bloom in my little flower garden are the Stardust daisies. I cut these three to enjoy in my kitchen (they match my cabinets and tile).

'Bloomin' Lovely' 6"x 6" Oil on panel.

Friday, 30 May 2014

Done!


I have finally finished my seagull drawing. 
The main changes from last time are darkening the background especially in the lower portion. I also darkened the seagull's reflection to make the white areas look brighter.
I am really happy with the result. I will leave it a while before going back to take a last look to see whether it needs any tweaking. If not I shall mat and then frame it.

Friday, 16 May 2014

Laying It On


The first layer is done. Standing back from the drawing the reflection looks better than it does close up. Six to eight feet away is the optimum distance for viewing artwork. Sometimes I forget this and fuss about how a piece of work looks until I leave the room and see the work anew as I come back into the room.
I think the reflection will look even better when I put another, darker layer of blue on the drawing. If you want something to look lighter then put something darker beside it.

Thursday, 15 May 2014

The Low Down


Here is my latest painting. I have just realised that I don't have a title for it yet. It is of the jetty on the ocean side of Dana Point Harbour. It is at low tide which is why you can see a portion of the beach on the left-hand side. 

Wednesday, 14 May 2014

Not Quite White

I am continuing to work on my seagull drawing. 


I am not too happy with how the reflection looks at the moment. I began wishing that I had done this drawing on toned paper (perhaps a grey) which would mean I could use a white pencil to put the white in. Because I am using the paper as the white it is harder to see how the white will look until all the blue and grey is coloured in. The white in my source photograph is very bright and the paper may not be bright enough to express that.

It is important not to make a negative judgement too early so I intend to continue on and see what happens when more of the blue is added. Although it is harder to erase coloured pencil than graphite, I can erase or lighten some of the reflection colours and make adjustments later on.
It is in the struggle that you learn to become a better artist even though that struggle is often discouraging and/or frustrating.

Thursday, 8 May 2014

Gullible

After constantly telling myself that I would get working on my seagull drawing this day or that, today I finally did. I worked mostly on the bird although it is not finished yet. 


However, I feel I have overcome whatever it was that was blocking me from working on this drawing. Instead of feeling frustrated and dwelling on the challenges, I tried to just enjoy the experience. It worked.

Prior posts about this drawing can be seen here, here, here, and here.

Monday, 21 April 2014

The Art of Travel

It always takes me longer to sort myself out after a trip than I would like or is even reasonable. But it is the way it is.


I have made very little progress on my seagull drawing mostly because I couldn't draw for a long time (and then not for very long) due to my accidents (yes there were two). So I am out of the habit.
I took my drawing with me when I went away and as I sat down to work on it I found my sharpener wasn't sharp enough to get the point on the pencil that I like for my drawings. A sharp point gives me more control on how and where I place my marks. The dull blade on the sharpener was ripping at the wood below the pigment. I didn't have a small screwdriver to change the blade so I thought I might try to do what I could.
Not a good idea. Every step I took just made matters worse.


Focus and looking at what is there (rather than what you think is there) is important when working on a drawing like this and for whatever reason, I jumped in and wasn't paying attention. So I made a mess of the legs by putting  yellow in the wrong place and not concentrating on the shape of the bird's legs. 
A combination of dull pencils, lack of focus and less than optimal lighting. 
What I need is one good positive session with this drawing to get back on track and feel motivated to continue on.

While I was away, I was lucky to catch an exhibition of religious art at Brigham Young University's Museum of Art called 'Sacred Gifts'. 
Some of the works are on loan from Churches in Denmark, Norway and New York. My two favourites can be seen on the flyer below. The first is 'Agony in the Garden' by Frans Schwartz (top far left) and the second 'Christ and the Rich Young Ruler' (bottom).


You can see all the paintings and learn about the artists here.

Tuesday, 15 April 2014

There is Beauty all Around

I recently returned from a road trip to another State to attend a friend's wedding. Although I took my seagull drawing to work on while away, I had a problem that meant I didn't get to spend much time on it and what I did was a bit of a mess. I'll be posting about that very soon.

I love to find beauty and art (or artfulness) in all the various situations I am in. Here I found it in the food tables at my friend's reception.


Monday, 24 March 2014

Rub a Dub Dub

I have not made much progress on my seagull drawing (see prior posts on this here and here) but thought I would post what I have done so far.

The first thing I did was tape the drawing paper to a board. This gives me a solid surface to press upon and protects the paper from being damaged as it gets moved aside on my desk. As I start to work more on the drawing I will cover it, between sessions, with tracing paper as another layer of protection.
What I usually do is move it right away from my desk area so that my other desk-based activities don't impinge on it but that hasn't happened yet…


So far all I have done is colour in the black rocks. The black pencil I used is from Derwent's Drawing range. This pencil range is more like 'b' graphite pencils with a softer look and feel to them. I really like them but in tiny rocks like these, they leave too much white showing. So I went over it with another black from the Derwent Studio range. This range is more like 'h' graphite pencils which have more clay in them that the 'b's'.


This pencil filled in the small white areas without having to press very hard.
I don't like to press hard as doing so can warp the paper and will also damage the tooth of the paper.
The tooth is the texture of the paper which can be seen by lightly rubbing a pencil across the paper. The degree of tooth will vary between papers. Paper for office copier machines will have very little tooth compared with drawing papers. Some types of paper, like Bristol paper, come with a smoother finish (conveniently called smooth) and a more textured finish called vellum. 
The paper you choose depends on the look you want. That also goes for the weight (or thickness) of paper you want. There is also a wide variety of weights available as well. See it explained here.
There are no rules, it all depends on what you discover you like.

The paper I am using came from a 22" x 30" sheet and is more or less card stock weight. Sorry I can't remember what the weight is (it doesn't say it on the label).

There is another piece of equipment that can damage the tooth of a paper - the eraser. By rubbing out your mistakes with a regular hard eraser (and doing so in a vigorous manner) you can destroy the paper's tooth, as well as risking scrunching the paper and damaging the whole drawing.

In this kind of drawing I use a kneaded eraser.


With a kneaded eraser you press it into the graphite or coloured pencil to remove it. A light touch is required and it takes longer to remove the pigment.


When you are learning and want to totally remove your marks then use cheaper paper and don't worry about the tooth. If you working on a nicer picture then use light marks with your pencil so it is easier to remove them.

One of the benefits of the kneaded eraser is the ability to shape it to help you erase tiny sections such as these small dots.


I always keep a regular eraser around just in case, and for coloured pencil pieces, I use a pencil sharpener that is only used with coloured pencils. This is an item I use a lot in my drawings. I like to keep my pencils very sharp throughout the process as I feel that I have more control when I have a shape point.


I personally like these manual pencil sharpeners. They are around $1.50 - $2. This one is a KUM and has one hole with a spare blade. I have others with two holes with one of the holes larger than the other for bigger pencils. 
It is time to replace your sharpener when the blade starts hacking at the wood above the point.

Monday, 17 March 2014

Fields of Dreams


This is from a photograph I took when I was last in England. It is of rapeseed fields which are in full bloom in May.
'Springtime Fields' 8" x 8" acrylic on board.

Friday, 14 March 2014

Abstract Inspiration

A couple of years ago I was given a Canson Montval art board when I attended a workshop. It won't accept oil paints so I decided to do a painting with my acrylics.
Probably because it was free, I decided to try something a little different and more abstract than usual. I also worked to be less slavish to my source photograph using it more for inspiration.
I am very happy with the result.


'Darkening Horizon' 8"x10" acrylic on board.


Monday, 10 March 2014

Flowering Outcomes

It is good to be painting a little more regularly now.


'Solitude Awaits Below' 8"x10" Oil on Board.


'Gerbera Trio' 5"x5" Acrylic on Canvas.


Monday, 3 March 2014

Charting a Course

The next step in the drawing exercise, I started last time, is to make a chart or plan of the colours I want to use.
I get all my different pencil sets out and try the colours that seem to most closely match those in my subject photograph.


I forgot about the tiny bit of yellow I'll need for the bird's legs. I don't quite have the right colour for the palest blue in the water but I can layer the blue with some white to lighten it up.


Wednesday, 26 February 2014

Drawing Out a Task

It is still difficult for me to spend time drawing but I miss it. So I decided to do a little at a time by splitting the tasks into five minute tasks. Eventually those five minutes will add up to a coloured pencil drawing. At least that is the plan.

First I chose a photograph. This is a 4"x6" photograph and that is the size I decided to do. I'm not a great lover of seagulls but I liked the reflections and texture of the water. Usually I chose a drawing for its challenge rather than liking the picture for itself.


Because the drawing will be the same size as the photograph, I could just trace the main features of the drawing. 
It is perfectly okay to trace an image. I know I can draw and I don't have to prove it to myself or anyone else and tracing saves time. However, if you are learning to draw then drawing items from life is recommended. Photographs flatten objects so practicing drawing from life helps you remember that objects are three-dimensional. When I was learning to draw (of course I am still learning) I would draw anything I could around the house. I even drew a roll of toilet paper once to practice a white item on white paper. Plus it is good to learn how to draw items that are very soft up to very hard.

Here is my tracing. I do have graphite paper that you can put under your tracing paper to transfer the picture onto your drawing paper. However, I find it transfers extra graphite where I am leaning on the paper but I just may be too messy.


So I usually turn it over and go over all the lines before turning it back over and tracing over all the lines again with the drawing paper underneath. 


This leaves a faint image of the tracing on your paper. It is now ready to add colour to.


I should add that the drawing paper is from a larger sheet of Royal Brites. I bought this so long ago that I can't remember what the weight is (it doesn't say this on the label) but it isn't a very heavy paper. Probably as thick as card stock sold in craft shops.

Tuesday, 18 February 2014

Cast of Colours


This is painted from a photograph I took in Hawaii two years ago. I lived in Hawaii many years ago and I love to travel there, when I can, to visit friends and enjoy the scenery. It was quite overcast during our trip last time which changes the depth of the colours without changing its beauty.

'Kona Clouds' 8" x 10" Oil on Canvas.

Monday, 10 February 2014

Setting to Work


Finally getting to do some painting again after my car accident last year. I can't paint for very long but just to be able to some is something to be grateful for.

Tuesday, 21 January 2014

Remembering


I was recently in this show in Canada but the on-line portion of the show didn't happen so I thought I'd post my entry here. Now the show is over, my card will be sent to one of the other participants and I wl receive someone else's card.

This is the first time I've entered a show like this and it was fun to do. On reflection there are things I would change about my piece were I to do it again. But art, like so many things in life, is about a journey where you continue to make progress and learn from your prior efforts.